Preparation
I have my easel and paints set up permamantly in my study. This makes set up relatively straightforward. My sittings are no more than around 2 hours usually - any more and I find my concentration flags! Make sure the room is well ventilated as well - oil paints and the mediums are strong smelling. My initial palate might start off with only have a few colours in it - blue / white and a brown. I add more as the session goes on depending on where the painting takes me. The main thing is to ensure the canvas is secured well on the easel. The canvas shouldn't wobble about, obviously. I also prefer to paint sitting down, although each to their own.
All of the source material should be close by - this can be a photographs you have taken of the scene, sketches you have made, other notes, or photos that other people have taken. The example is of the Glen Sannox painting I did as a commission in March 2010. I have never been to Glen Sannox and so had to rely on photographs and refrence material provided by the client for source.

This is the most important part of the picture, although it usually takes a matter of 20 minutes or so to complete. I paint the basic outline with a pale mixture of cobalt blue and white. I never use pencil, charcoal, or dark paints. This causes major problems later because oil paints can be very transparent and you don't want your 'working' showing at the end of the day! There is very little detail at this stage. There is no point painting every form in minute detail - the key thing is to get the composition looking right.

Next, I block in the blue areas. This is all using prussian blue. The colour is blocked in roughly with a large brush, crudely.
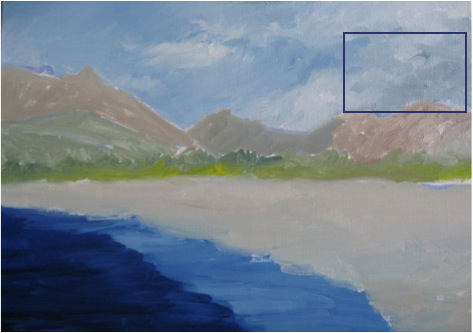
At this stage I have covered the entire canvas with the first layer of paint. The beach has been started with a mixture of white and burnt umber. The greens are Cadmium Yellow and paynes grey. The mountains are blocked in with burnt umber and white in brush, with a little french ultramarine added for the far away hills. The clouds have used a basic mixture of french ultramarine, burnt umber and white.

This is now us at the end of the first sitting (probably a few hours). The mountains have been further developed with darker shades of paynes grey. There is a little knife work on all of the mountains. At this stage they are close to finished with only some highlights left to complete them. A little more cadmium yellow has been added to the green strip and the mid ground to give the impression of the sunlight. The upper area of the mountain has been scraped on with a pallette knife using burnt umber and white.

This is now us at the end of the second sitting. The highlights have been added to the mountains roughly with a knife over the firmer base from the first sitting, to create a more dramatic lighting effect. This 'scraping' creates an immediate rocky effect. There are a matter of a few scrapes to suggest the sun striking the rough surface. This shade is carried through to the mid ground and the tops of the mountains in the background. The darker areas have been added with burnt umber and french ultramarine. This is initially applied with a brush with a fairly fat mix (a greater proportion of linseed oil in the medium) to give greater depth to the finish. The sky has been worked on a little - the blues have been sharpened up. The green strip has been developed further with a little more detail - although still very broad.The beach and shoreline has been further developed. The water is a further glaze of paynes grey followed by the same colour with more white. Notice at this stage the area that will become the seaweed is a little messy because of an error on my part (oops). The paint was scraped off, and this will be corrected in the next sitting.

This is the end of the picture. The seaweed and foreground has been refined a little, and the green areas also further developed.